Flat-lay to model photos: the AI shoot workflow
Turn the flat-lay, mannequin or hanger shot already in your admin into on-model product photos — casting, scene, poses, edits, then publish to the product.
What a flat-lay leaves out
You have the garment photographed flat, lit evenly, square to the camera. That is the right way to show a weave, a print, a button. It is the wrong way to show a body.
Drape, weight and fall are what the flat photograph loses. A shopper looking at a dress laid on linen can read the colour perfectly and still not know where the hem lands or whether the waist is fitted or forgiving. The same goes for a mannequin, which has no hips to speak of, and a hanger, which turns every shirt into the same shirt.
Nothing here says stop shooting flat-lays. They are repeatable, they show detail well, and they are the input to everything below. They are just not the image that closes the sale.
The shoot you keep postponing
The shoot is not the expensive part — the coordination is. Studio, model, stylist, a half-day in the diary, and a piece you have already photographed once in a different colourway.
The honest version of the argument: an AI shoot does not replace a campaign. If a season has a story to tell, book the day and tell it. What this replaces is the second shoot, and the ninth — the restock in navy, the size run, the twelve SKUs that arrived after the photographer went home and have been on a hanger ever since.
The workflow, from admin image to product page
Selvette's Studio starts from the photos already sitting in your admin. There is no reshoot step and no plate to prepare.
- Pick the source image. The flat-lay, the mannequin shot, the hanger shot — whatever exists.
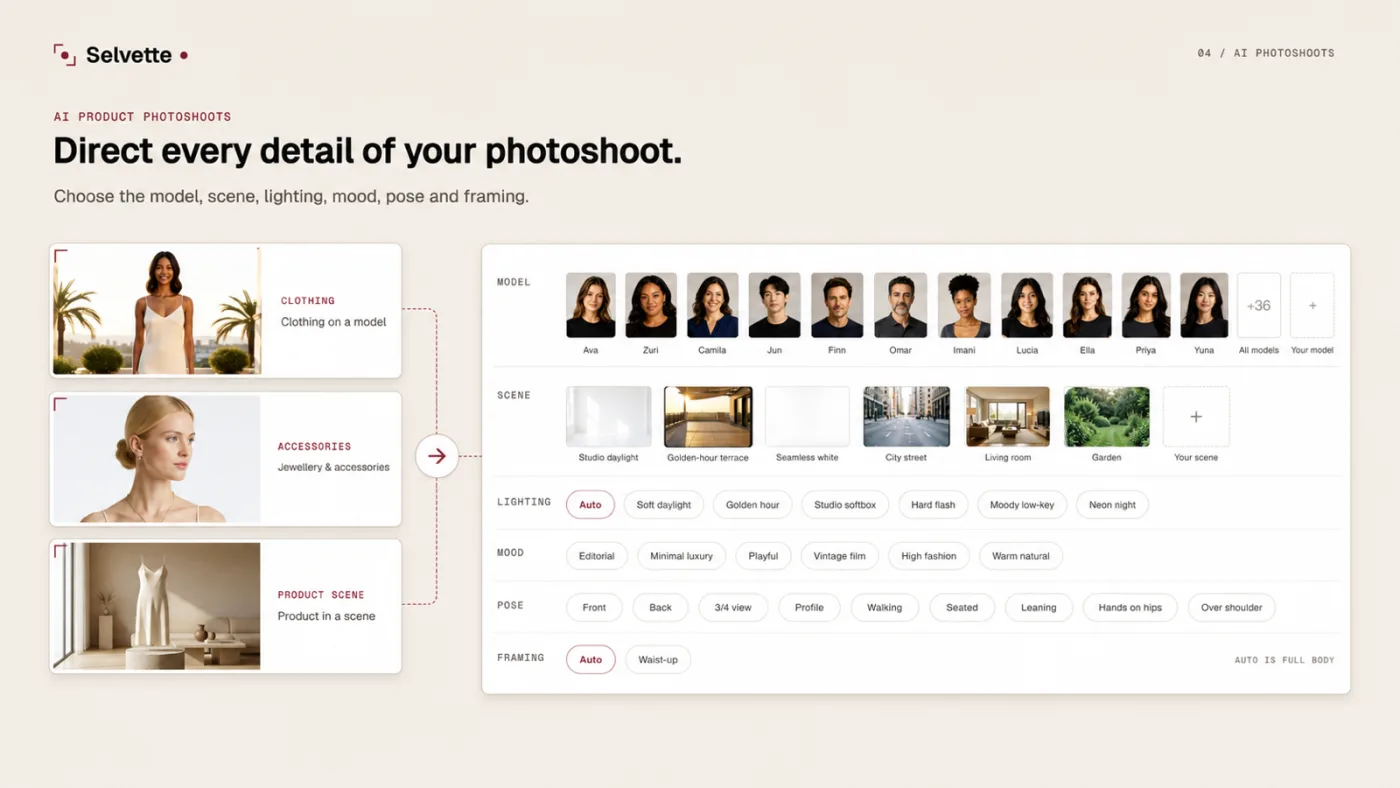
- Pick the shoot type. There are three: On-model for apparel worn by a model, Accessory for jewellery, eyewear and bags, and Product Scene for styled product-only shots with no model in frame.
- Cast it. Choose from the model roster or bring your own, then set skin tone from Fair through Deep, expression, and hair.
- Set the room. Scene runs studio, city street, garden, living room and golden-hour, or you upload a location of your own. Lighting covers soft daylight, golden hour, softbox, hard flash, moody and neon. Mood covers editorial, minimal luxury, high fashion and vintage.
- Choose the poses. Up to 6 in a run: front, back, three-quarter, profile, walking, seated, leaning. The back view is the one most catalogues never have and shoppers keep asking for.
- Set framing and aspect ratio. 4:5 for the product page, 1:1 for the collection grid, 3:4, and 9:16 for stories and reels.
- Generate. An image takes about six seconds. 1 image costs 1 credit, and a generation that fails costs nothing — the credit is reserved when the job starts and released if it does not deliver.
Then direct it, like a photographer
The first frame is rarely the final one. Selvette keeps the shoot open as a conversation: you type the next instruction in plain language — "pull back a bit", "turn her towards the window", "warmer light, hair up" — and the garment stays consistent from turn to turn rather than quietly redesigning itself into a different neckline.
You can also branch from any earlier turn. If turn three was right and turns four and five went somewhere you did not want, go back to three and take a different road from there, without losing what you already have. Each send costs 1 credit.
Looks, so the second garment does not start from scratch
A run eventually looks like your brand: that light, that model, that framing. Save the configuration as a Look and the next garment starts from it. Across a 40-piece range that is the difference between a collection grid that reads as one shoot and one that reads as forty separate afternoons.
What to check before it goes live
Polish is not accuracy. Before anything reaches a product page, put the source photo next to the output and look at the details a customer will hold you to when the parcel arrives.
- Hem and sleeve length, against the body rather than against the frame.
- Neckline and collar shape, which is where a generated image is most likely to drift.
- Hardware — zip pulls, buttons, buckles, and how many of each.
- Print placement and repeat, and any lace, embroidery or trim that could be smoothed away.
- Colour under the lighting you chose, since golden hour will warm a white and neon will not flatter a beige.
If something is wrong, say so in the next turn rather than starting over.
Gallery, download, publish
Everything lands in a Gallery. From there you download the files, or publish an approved image straight onto a Shopify product or a specific variant — the navy shot on the navy variant. On Shopify that is one click; on any other storefront, Selvette runs from a snippet and everything above works the same way.
The on-model image and shopper try-on do different jobs on the same page. The model photo tells a shopper what the garment is. AI virtual try-on tells them what it is on them. Neither substitutes for the other, and the second tends to be the question the first one raises.
FAQ
Can AI turn a flat-lay into an on-model photo?
Yes. Selvette's Studio takes a flat-lay, mannequin or hanger photo from your product admin and generates the garment worn by a model, with your choice of model, skin tone, scene, lighting, mood, pose, framing and aspect ratio. Each image costs 1 credit and takes about six seconds, and you refine it in plain language afterwards rather than re-running from the beginning.
Do I still need flat-lay photography?
Yes, for two reasons. Flat-lays remain the clearest way to show a print, a texture or a construction detail, so they keep earning their place in the gallery. They are also the input — the Studio works from the photograph you already have, so the better and more evenly lit that source shot is, the closer the first generated frame will be.
How do I keep every product looking like the same shoot?
Save the shoot configuration as a Look once you have a run you are happy with, then apply it to the rest of the range. The model, scene, lighting, mood and framing carry across, which is what makes a collection grid hold together — two or three Looks generally cover a whole catalogue.
What happens if a generation comes out wrong?
If the job fails or errors, the credit is released and you are not charged for it. If it delivers but is not what you wanted, keep going in the same conversation — adjust the crop, the light or the pose in the next turn, or branch back to an earlier turn you preferred. See what a credit covers for how the balance works across images, try-ons and video, the Selvette use-case index for where else this workflow applies, and how to get on-model photos without a photoshoot for a longer walk-through.